

Lash Fill Vs. Full Set
What is a lash fill-in? How do they do eyelash fills? What is the difference between complete set and lash fill? A lash fill-in is a service between a client's monthly fills. This can be a great way to get more wear out of the lash extensions and keep them looking fresh. A lash fill is also a good option if a client wants to add more volume or length to their lashes.
In this blog, we will be talking about lash fill, when you should do or not do a fill, and the steps to follow when doing a refill.
WHAT IS A LASH FILL?
New lash extensions are applied to the client's natural lashes as the old ones fall out; that is what you call lash fills. Your client should come in every 2 to 3 weeks, but longer wait times may imply that filling the lashes will take longer because there will be more lashes to fill.
Lash extension fills are simply new lashes placed on natural lashes as the old ones have fallen out, in order to ensure that the lashes stay nice and full.

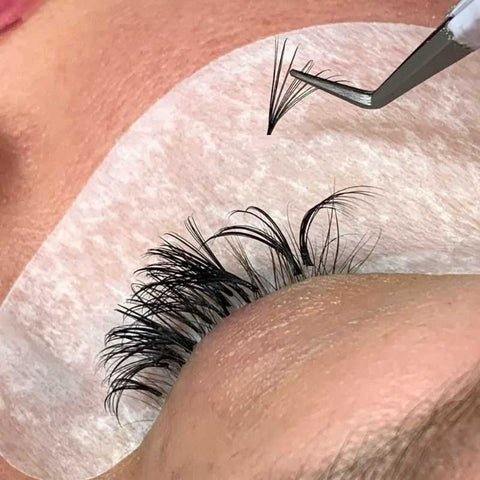
Gel Under Eye Patches, Eyelash Extension Ballet Slippers Tape, Ultra Crystal Bond, Lashes and Lash Wisps used in this set. To shop, please click here.
Why do lash clients not return for refills?
- No booking site
- They didn't book follow up appointment
- Not informing client the importance of lash maintenance
- They did not like lash extensions
- They found it too expensive
Here's why we need lash fill every 2-3 weeks because lashes grow out:
After week 3, it's always advisable to charge a client for a full set after week 3, because there will be too many lashes that have grown out, and will need to be removed. There will be almost no lashes left over, and time wise it will take almost the same time as a full set.

Lashes and Elite High Humidity Adhesive used here. To shop, please click here.
It is NOT a refill; here's why:

Optite Low Humidity Adhesive, Lashes and Gel Under Eye Patches used in this set. To shop, please click here.
The client comes and says I'm here for my refill, and I have about 40 % of lashes left. That's is technically accurate. BUT…60-70% of those lashes have grown out to the point that they will twist over and OR break the client's natural lashes if not removed. Therefore the lash artist will spend about 15-20 min removing the grown-out lashes, then proceed to an almost FULL set, except about 10-20 lashes in each eye.
Keep in mind that time-wise, this now took 1.5-2 H almost the same time of not the same time as a FULL set.
Therefore, if you are a lash artist, feel yourself burning out and feel like you are not charging your worth, this could be one of the culprits.
So how to solve this issue? You need to educate your clients and explain to them that since you have had to remove most of the grown lashes and charged for a FULL set ( most will be understanding )
It will NOT happen at every appointment with every refill, but it could happen every 3rd or 4th refill for most clients.
Protect your time and your boundaries. Otherwise, you are at high risk of burnout after a few years as a lash artist.
For more tips like this one be sure to subscribe to our email list, we send very informative and helpful emails every week, please click here.
LASH FILL VS FULL SET
Should you do a whole set or a refill, especially if you're a beginner lash artist? Lash fill is a controversial topic. It can be challenging when you're a beginner.

Straight Isolation Tweezer, Precision Volume 90 Degree Tweezer, Gel Under Eye Patches, Ultra Crystal Bond, Lashes, Lash Tile and Coloured Agate Stone used in this set. To shop, please click here.
Refills are not the best for beginner lash artists, because you will continue to make mistakes as a new lash artist, and your work will not be perfect, which is just fine. However, with refills, your errors might compound, meaning you'll be still figuring out how your glue works, which means you'll continually make stickies in your career, which isn't ideal. Aside from stickies, there will be some lashes that have outgrown, and you need to remove, as well as other lashes that will fall off, leaving gaps that will need to fill, and you'll be learning how to apply volume.
I would recommend removing the lashes entirely and doing a complete new set for beginners. However, if that isn't something you want to do, you may work on refills instead.

Volume Lashes mix curls D, CC, and C, and Velour Lash Adhesive used in this set. To shop, please click here.
For more tips like this one be sure to subscribe to our email list, we send very informative and helpful emails every week, please click here.
CONTRAINDICATIONS FOR LASH FILL
Lash refills can have some contraindications, Here are some cases when you would you not do a refill.

Ultra Crystal Bond, Lashes, Lash Wisps, and Vintage Lash Mirror used in this set. To shop, please click here.
IF THE CLIENT HAS LESS THAN 40% OF EXTENSIONS
Based on what I've learned, I wouldn't recommend refilling if your client has less than 40% of her lashes remaining from the last set. It is because it'll take the same amount of time as completing a full set. After all, you'll have to go through and remove stickies, prep, and clean the lashes.
A LOT OF STICKIES
If the clients have a lot of stickies, you'll have to go through them one by one and remove them using the banana peel method. It can take a long time, and if there are a lot of stickies, it's sometimes easier to remove the entire set, and starting over.
IF THE CLIENT WANTS A DIFFERENT LASH STYLE
You won't refill if the client wants a different kind of mapping. For example, let's say the client comes in with a complete set of volume lashes from a previous lash set, and she wants you to do a wispy look on her. In this case, it's much better to tell the client, "Let's remove your full set and start over and do a perfect set of wispy volume lashes."
IF THE CLIENT DOESN’T TAKE GOOD CARE OF HER LASHES
Lastly, I would not recommend a refill if the client has terrible lash care, and when she comes in, her lashes are dirty and unkept. I'd suggest removing the lashes and doing a complete set, as well as educating the client on proper lash care. It's tough to remove all accumulated dirt over the last two to three weeks.
For more tips like this one be sure to subscribe to our email list, we send very informative and helpful emails every week, please click here.
HOW TO ISOLATE SOME OUTGROWN LASHES AND REMOVE THEM BEFORE A REFILL?
TECHNIQUE #1 ( BANANA PEEL TECHNIQUE )
STEP #1
The banana peel technique is easiest to remove the extensions before lash fill. One tweezer holds the natural lash, while the other keeps the extension.

Velour Lash Adhesive, Lashes, Gel Under Eye Patches, Dolphin-Shape Curved Tweezer and Azara Lash Tweezer used in this set. To shop, please click here.
STEP #2
Simply pulling in different directions, as if peeling a banana, should easily separate the lashes. You probably applied too much lash adhesive if it doesn't work, and you have to use a lot of force.

Velour Lash Adhesive, Lashes, Gel Under Eye Patches, Dolphin-Shape Curved Tweezer and Azara Lash Tweezer used in this set. To shop, please click here.
Here's precisely how you do it:

For more tips like this one be sure to subscribe to our email list, we send very informative and helpful emails every week, please click here.
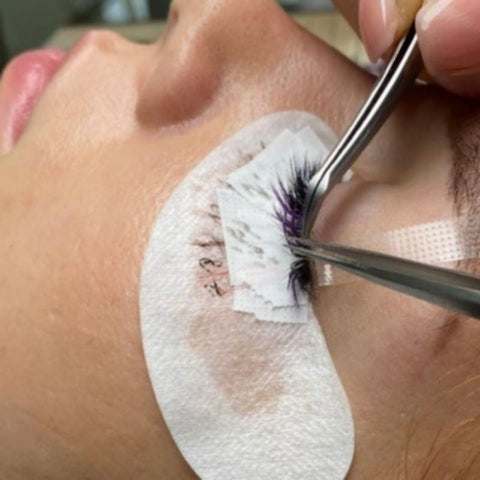
TECHNIQUE #2 ( USE A PAPER TAPE AND REMOVER )
It is good to look for another method except for the banana peel technique. It takes a bit longer, but it's more gentle and just as effective at removing outgrown lashes before a refill. You can use this technique if your client has a lot of outgrown lash extensions, and you don't want to use the banana peel technique.
STEP #1
Apply paper tape on the client's eyelid in a circular way.

STEP #2
Take the lashes that you need to isolate and put them on top of the tape.

Mega Volume Lashes, Optite Low Humidity Adhesive, and Gel Under Eye Patches used in this set. To shop, please click here.
STEP #3
Apply cream remover on the adhesive areas and wait 5 min, then remove the tape, the cream remover should have dissolved the lashes.

Mega Volume Lashes, Optite Low Humidity Adhesive, Gel Under Eye Patches , Cream Sensitive Pro Remover and Bamboo Lash Wand used in this set. To shop, please click here.
STEP #4
Cleanse the lashes with lash shampoo, and you are ready to start your refill.

Lash Foam and Disposable Eye Lash Brush used in this set. To shop, please click here.
For more tips like this one be sure to subscribe to our email list, we send very informative and helpful emails every week, please click here.
HOW TO DO A LASH FILL?
So now we'll talk about what steps you should take if you're doing a refill on one of your regular clients who has good lashes and takes care of them, and what steps you should take while doing an actual refill. I would follow them in this order.
STEP #1 LOOK THROUGH THE CLIENTS LASHES FOR ANY STICKIES
If you notice a lot of stickies on your client's lashes and it looks filthy, there is probably too much glue, and you should remove it. If there are only stickies, you can use the banana peel technique to remove them quickly, and it shouldn't take long, maybe 10-15 minutes, depending on the situation.
Gel Under Eye Patches, Breathable Tape, Lash Extension Medical Tape, L Shape Tweezer and Straight Isolation Tweezer used in this set. To shop, please click here.
STEP #2 CLEAN THE CLIENT'S LASHES
Remember to clean the lashes with lash foam shampoo, then thoroughly rinse them before applying the primer. Take a micro brush and apply it straight to the client's lashes; this will remove all the oils from the lashes and increase your client's retention.

Lash Foam used here. To shop, please click here.
STEP #3 LOOK FOR ANY OUTGROWN LASHES
Use the banana peel technique to remove any lashes that have grown out past 2-3 millimeters. If you leave these lashes, they will actually twist over and can cause discomfort and possibly cause the natural lashes to get damaged.

L Curl Lashes, Ultra Crystal Bond, Marlowe Tweezer and Malachi Tweezer used in this set. To shop, please click here.
STEP #4 DRY THE LASHES
With a fan, dry the lashes thoroughly, which should only take 2 or 3 minutes, and you're ready to begin your lash refill.

L Curl Lashes, Ultra Crystal Bond and Portable Handheld Cooling Fan used in this set. To shop, please click here.
For more tips like this one be sure to subscribe to our email list, we send very informative and helpful emails every week, please click here.
How much should you charge for a lash refill?
Most lash artists and most salons charge 45-50% of the full set price for a fill as long as the client comes within 2-3 weeks. The important distinction is to make sure the client still has at least 40% of their lashes remaining. If the client has less than 40 % of their lashes, they should be charged for a full set, as it will take almost as much time as a full set.
Many lash artists also charge by the amount of time they spend on their client's sets. For example, if it takes the lash artist 1h30 minutes to do a set, they may charge 150$; for 2h they may charge 200$; for 2h30 they may charge 250$.

Promade Volume Fans, Velour Lash Adhesive, Gel Under Eye Patches and Straight Isolation Tweezer used in this set. To shop, please click here.

Promade Volume Fans, Velour Lash Adhesive, and Gel Under Eye Patches used in this set. To shop, please click here.

Promade Volume Fans, Velour Lash Adhesive, Gel Under Eye Patches, Breathable Tape, and Lash Extension Medical Tape used in this set. To shop, please click here.
For more tips like this one be sure to subscribe to our email list, we send very informative and helpful emails every week, please click here.
CONCLUSION
Getting a lash refill is an important part of maintenance when it comes to keeping your client's lashes nice and full.
Another reason a client may want to get a lash refill is that their lashes are falling out faster than usual due to stress or other factors such as illness or medication changes. A lash refill will help repair any damage from falling out faster than usual so that they look healthy again.
You should also emphasize the need for refills to your client and educate them on the value of lash care. The normal lash growth cycle will cause extensions to shed. Lash fills are a great way to extend the life of the lashes and should be done every 2 to 3 weeks or depending on how quick the lashes fall out. Refills keep the lash set looking thick.
Watch this lash extension tutorial video and learn more if you should do refills or full set as a lash artist especially a beginner lash artist.
Do you find this blog post helpful? Have you learned something? Leave a comment below and share your thoughts. Don’t forget to share this blog with your lash friend.
Be sure to follow ThousandLashes on our social media - Facebook, Instagram, Pinterest and YouTube for helpful lash tips and tricks.
Anyone needing lash support or lash tips and tricks? Thousandlashes Lash Artist Facebook Support Group will always be open for the kind of support that you will be needing on this lash journey.
For more tips like this one be sure to subscribe to our email list, we send very informative and helpful emails every week, please click here.
We used these techniques to create a beautiful set of wispy lashes. To get your FREE Training Ebook, please click here.
*Grab your FREE Training Ebook on wispy lashes now! ( limited time only )
To purchase lash products, check out our website. SHOP NOW
ThousandLashes team will do our best to service you with our high-quality products and best service.
RELATED POSTS THAT YOU MIGHT FIND HELPFUL TO UPSCALE YOUR LASH BUSINESS:
Best Lash Trays For Eyelash Extensions: Learn about the different lash trays and how they vary in this blog.
How To Apply Eyelash Extensions Step By Step: Know all the steps required to apply lash extensions including what does lash primer do, how to remove the eyelash extensions safely, and more about it.
Benefits Of Using Lash Primer: In this blog, you will learn more about lash primer, when and how to use it, also when doing lash fill.
Embark on heart-pounding adventures with Turbo Moto Racer, where you’ll commandeer a selection of high-powered motorcycles through breathtaking landscapes. Feel the adrenaline surge as you speed through stunning settings, making every ride a visually stunning and pulse-pounding experience! https://turbomotoracer.gitlab.io/
Leave a comment