

6 Lash Extension Hacks You Need As A Lash Artist
How do I get better at eyelash extensions? Is it hard to be a lash tech? What are eyelash extension tips and tricks for beginners?
We have all been there as a newbie. I became clueless, too, with so many things. Throughout the years, I have so many things that I tried and tested that work with me well. I got some lash techniques advice from other lash artists, some from watching YouTube videos about eyelash extensions, but most of it is the ones that I tried on my own.
I made this list of the things that I think would be beneficial for you and might help you with your lash journey.
These are the things that work well for me and might be helpful, and hopefully, you can try them on and let me know what you think.

Volume Lashes mix curls D, CC, and C, Velour Lash Adhesive are used in this set. To shop, please click here.
New to lash photo editing? We've got you covered with our Free Lash Editing Tutorial. Click here to learn more!
Lashes can be a tricky business. But thankfully, we've compiled a list of tips to help you save time and money.
If you're a lash artist, you know the struggle is real. From making the perfect fan to creating a flawless finish, lashing takes patience and practice. But thankfully, we've got some tips to make your life as a lash artist just that much easier.
1. How To Store Your Lash Adhesive
Store it in a vault that will protect it from humidity after opening it.
This item is a storage box designed for eyelash adhesive—made of premium material, durable for long-term use. Keep fresh, reduce the curing condition of glue, effectively improve the storage time of thee eyelash extension glue.

Lash Adhesive Vault, Velour Lash Adhesive, Ultra Crystal Bond and Ultra Crystal Clear Bond are used in this set. To shop, please click here.
PRO TIPS
Lash adhesives are incredibly picky and are greatly affected by external elements such as heat and oxygen. Here is some advice on ensuring your bond stays as fresh as possible to avoid any issues.
TIP #1 STORE IN AN AIRTIGHT CONTAINER
So what makes the adhesive vault so unique? When you close the cap, most of the air in the jar is squeezed out via the small opening, resulting in a vacuum-sealed bottle.
TIP #2 STORE IN THE REFRIGERATOR
If you refrigerate your adhesive to preserve it, ensure that the temperature is not lower than 10 degrees C/50 degrees F. Store in a closed package with a silica gel pack.
TIP #3 THROW AWAY YOUR LASH ADHESIVE AFTER 4 WEEKS
If you follow these instructions, your adhesive will stay as good as new for four weeks. For best results, replace any remaining adhesive after four weeks and start with a new bottle.
For more tips like this one be sure to subscribe to our email list, we send very informative and helpful emails every week, please click here.
2. Always Burp Your Adhesive
Always burp your adhesive to ensure that your bond lasts for as long as possible (usually four weeks). If you do not burp the lash adhesive, the air will get into the glue, making it much less effective.
Ultra Crystal Bond is used here. To shop, please click here.
For more tips like this one be sure to subscribe to our email list, we send very informative and helpful emails every week, please click here.
3. Lash Retention Issues
Clean Lashes: The natural lashes of your clients should be very clean. Natural oils and dirt must be removed from the lashes for adequate bonding. It's at this point when lash primer comes in helpful.
Glue: Give your bond a good shake before using it. The ingredients in your glue can separate if you leave it out for too long. To properly mix everything, shake for around 30 to 60 seconds.
Humidity: The lash adhesive works best when the humidity level is between 40 and 60 percent. Have a hydrometer to keep the humidity in your lash room in order. It is a must-have tool that is also reasonably priced.
Temperature: To keep your glue consistent, ensure your temperature is in the correct range.
Dehumidifier: You need a dehumidifier if the humidity in your lash studio is high.

Purple Color Lashes and Velour Lash Adhesive are used in this set. To shop, please click here.
For more tips like this one be sure to subscribe to our email list, we send very informative and helpful emails every week, please click here.
4. How To Hold Your Eyelash Tweezers?
As you guys guessed, the "ergonomically" is correct. The way to hold your tweezers is the method on the right.
This method allows your wrist to be at a natural position that prevents fatigue and injury and gives you even tension on the tweezer for gripping the lash/fan.
If you are someone who holds their tweezer-like pencil and finds holding it the other way awkward, keep practicing DAILY to correct it. I promise it feels more natural, and you'll improve your speed daily and prevent this awful condition called carpal tunnel syndrome.

Short Tip Boot Lash Tweezer is used here. To shop, please click here.
For more tips like this one be sure to subscribe to our email list, we send very informative and helpful emails every week, please click here.
5. Shake Your Lash Adhesive
Always ensure that your clients get the best retention.
Lash retention is a complex subject we could talk about at length for hours.
Suppose I can give you guys one tip. That may help or not help if other factors need to correct.
If you haven't mixed your adhesive yet, it will look like the first drop in the photo. It will appear as if it has condensation. I recommend having a glue shaker on hand. It will help with that hand fatigue and do the job much more efficiently.
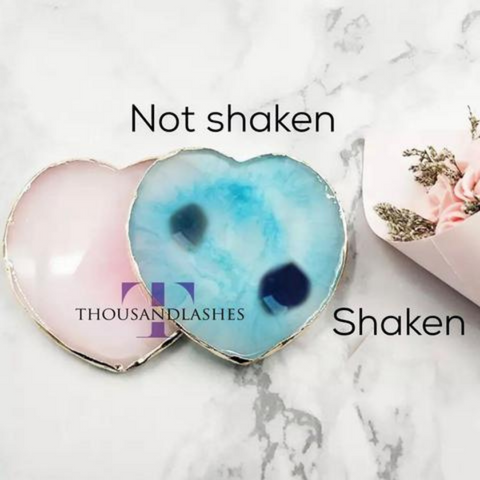
Glue Shaker Machine is used here for the shaken adhesive. To shop, please click here.
For more tips like this one be sure to subscribe to our email list, we send very informative and helpful emails every week, please click here.
6. How To Isolate?
Double-handed isolation technique. You can use both of your hands to isolate lashes. It is one of the easiest ways to work on your client's lashes. You can help yourself with the second hand to isolate until you feel confident using only one hand.
The single-handed isolation technique is when you use only one hand to isolate
To help with isolation, you can isolate the lashes vertically by using tape or patches to help visualize the lash layers and lash every lash..

Straight Isolation Tweezer and Gel Under Eye Patches are used in this set. To shop, please click here.
For more tips like this one be sure to subscribe to our email list, we send very informative and helpful emails every week, please click here.
WHAT MAKES A GREAT ISOLATION TWEEZER?
The most crucial aspect would be proper grip. If the isolation tweezer allowed you to have a fantastic grip, it would be much easier to isolate.
You can use one tip to isolate with two tweezers and help with your 4th finger to get the lashes out of the way. Don't be afraid to find the perfect position, even if it's not how your lash course taught you to do it.
The correct grip for your isolation tweezers is vital. You can try holding your lash tweezers like a pen to be able to approach the natural lash from various angles.
Another tip is to try isolating from the side of the lash line at a 45- 30-degree angle. It will assure that you can separate the natural lashes easier, especially if they are dense and thick.
Keep in mind that you are isolating only from the top of the lash line. You are not giving yourself the view of all the angles. Try using your lash mirrors as well for better visualization.

Gel Under Eye Patches, Eyelash Extension Ballet Slippers Tape, Mega Volume Lashes and Ultra Crystal Bond are used in this set. To shop, please click here.
For more tips like this one be sure to subscribe to our email list, we send very informative and helpful emails every week, please click here.
CONCLUSION
Like me, you're obsessed with finding new lash hacks to make your life easier. Because there's nothing worse than having a client call you three times for a fill after only two weeks, check their lashes before applying new extensions. It might seem obvious, but it's something that most lash artists forget to do.
Do you find this blog post helpful? Have you learned something? Leave a comment below and share your thoughts. Don’t forget to share this blog with your lash friend.
Be sure to follow ThousandLashes on our social media - Facebook, Instagram, Pinterest and YouTube for helpful lash tips and tricks.
Anyone needing lash support or lash tips and tricks? Thousandlashes Lash Talk for Beginner Lash Artists will always be open for the kind of support that you will be needing on this lash journey.
For more tips like this one be sure to subscribe to our email list, we send very informative and helpful emails every week, please click here.
If you want to learn and create a beautiful set of wispy lashes. We have a FREE Training Ebook just for you, please click here.
*Grab your FREE Training Ebook on wispy lashes now! ( limited time only )
To purchase lash products, check out our website. SHOP NOW
ThousandLashes team will do our best to service you with our high-quality products and best service.
RELATED POSTS THAT YOU MIGHT FIND HELPFUL TO UPSCALE YOUR LASH BUSINESS:
How To Work With Difficult Lashes?: Anyone had the struggle to work with difficult lashes? Anyone knows the bridging technique? Watch this detailed lash video.
How To Use Eyelash Extension Primer?: Detailed video on how to put lash primer.
Amazing Lash Retention: In this blog, you will know what are some eyelash extension tips and tricks for beginners to get amazing lash retention.
Leave a comment