


How To Apply Eyelash Extensions Step By Step
How do you apply eyelash extensions? How to apply lash extensions faster? Eyelash extensions are one of the most popular forms of beautification nowadays. When it comes to applying them, time, dedication, and a lot of practice are essential, especially when you're just starting as a lash artist.
In this blog, you will learn all the steps required to apply lash extensions, how to remove the eyelash extensions safely and correctly, eyelash extensions before and after, and lash care instructions but first, let me discuss how to prepare for a lash appointment.
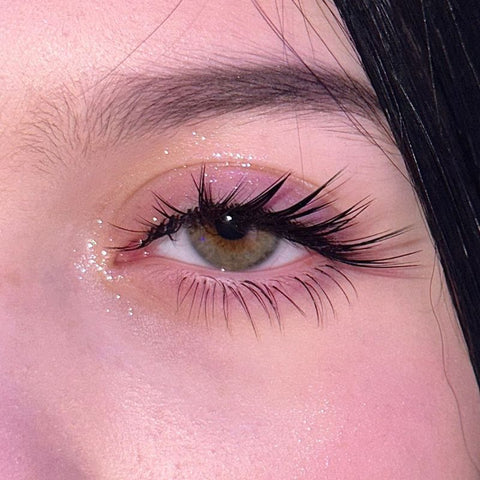
Cashmere Noir Collection Volume Lashes 0.07 C curl, Incredible Retention Primer, Super Bonder, Bullet Lash Adhesive are used in this set. To shop, please click here.
Want the lowdown on wispy lashes? Click here for a comprehensive guide.
New to lash photo editing? We've got you covered with our Free Lash Editing Tutorial. Click here to learn more!
Lash artistry is one of the most sought-after careers in the beauty industry. There are various ways to apply, remove, and care for eyelash extensions. Today I want to give you my top tips on preparing for a lash appointment as an eyelash artist.
Have you ever wanted to try lash extensions but had no idea how to apply them? Or maybe you've been waiting for someone to teach you some of the basics. Either way, this is for you. We've got everything you need to know about getting the perfect set.
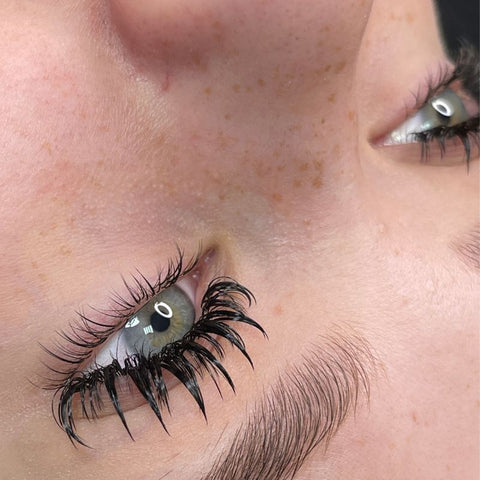
Wet Volume Lashes, Bullet Lash Adhesive, Super Bonder, and Incredible Retention Primer are used in this set. To shop, please click here.
Discover everything about anime lashes with a simple click – from application techniques to style tips. Please click here.
HOW DO WE GET CLIENTS READY FOR EYELASH EXTENSIONS?
The prep work is the essential aspect of performing lash extensions. If the client is prepared correctly, the application process will go smoothly.
- When you begin your lashing process, conduct a thorough consultation to determine the style, length, and thickness that your client prefers.
- Before applying eyelashes, remove eye makeup with a water-based cleaner and dry it with a lint-free cloth. A client with a clean face will give you more time to deal with their eyelashes. It is not recommended to curl eyelashes. It is better to work on the lashes while still in their natural condition.
- Contact lenses must be removed during lash application to avoid discomfort and eye damage.
- Drinking liquids containing caffeine can cause eyelids to move, making it challenging to apply eyelashes. Excessive eye movement can lead to incorrect extensions.
- Limit the intake of liquids. It is advised that clients do not use the restroom frequently.
- Before the eyelash appointment, ask questions about your clients' allergies. In addition, for the client's safety, it is best to have them sign a waiver during the consultation. (if needed)
- While having a relaxing appointment, they can listen to music or a podcast. To avoid distraction and reading text messages, they must put their phone in silent mode. For the safety of every client, they should keep their eyes closed throughout the session.
- A fill session lasts about 40 minutes to an hour, while a full-extension process takes 2 to 3 hours. Inform your clients that they should wear comfortable clothing for the relaxing session.

Straight Isolation Tweezer, Precision Volume 90 Degree Tweezer, Hydrogel Under Eye Patches, Ultra Crystal Bond, Lashes, Lash Tile are used in this set. To shop, please click here.
For more tips like this one be sure to subscribe to our email list, we send very informative and helpful emails every week, please click here.
ARE LASH EXTENSIONS BAD FOR YOUR NATURAL EYELASHES?
The beauty world is buzzing with the topic of lash extensions and one frequently asked question is, "Are they harmful to our natural lashes?" Let's clear this up.
The Short Answer: No, lash extensions are not bad for your natural eyelashes, provided they are applied correctly and with care.
The Details:
-
Professional Application: The key to safe lash extensions is in the application. If put on correctly and professionally, lash extensions will not damage your natural lashes. Always ensure that you are getting your extensions done by a certified and experienced lash artist.
-
Choose the Right Extensions: Not all lashes are created equal. Selecting the correct length and thickness for your natural lashes is crucial. Too heavy or long extensions can strain your natural lashes, leading to potential breakage.
-
One-by-One Application: A golden rule for applying lash extensions is to use one extension on one natural lash. This prevents the natural lashes from being weighed down or clumping together, which can cause them to break.

Volume Lashes mix curls D, CC, and C, and Velour Lash Adhesive are used in this set. To shop, please click here.
For more tips like this one be sure to subscribe to our email list, we send very informative and helpful emails every week, please click here.
HOW DO YOU APPLY EYELASH EXTENSIONS FOR BEGINNERS?
Diving into the world of eyelash extensions? This beginner-friendly guide breaks down the essential steps to achieve those dreamy, fluttery lashes.
From selecting the right lash style to mastering the application technique, we've got you covered. Start your lash journey with confidence and precision!
STEP #1 | WASH THE CLIENT'S EYELASHES
Before starting, ensure the client's lashes are clean. Remove any makeup and oil to prevent the adhesive from breaking down.

Lash Foam is used in this set. To shop, please click here.
STEP #2 | APPLY PRIMER TO THE CLIENTS LASHES
Using a primer prepares the natural lashes for extensions. This ensures better retention and improved attachment of the lash extensions.

Incredible Retention Primer and Hydrogel Under Eye Patches are used in this set. To shop, please click here.
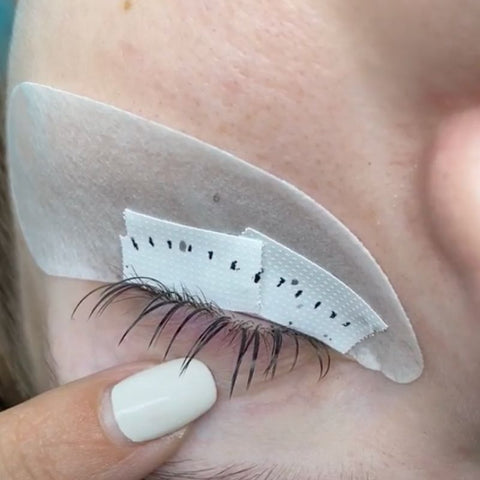
STEP #3 | APPLY THE UNDER-EYE PATCHES GENTLY
Place the lash patches carefully under the eyes. Avoid letting your tweezers touch the eye pads. It's important to ensure no lower lashes are stuck or glued together.

Micro Foam Under Eye Patches is used in this set. To shop, please click here.
STEP #4 | MAP OUT YOUR EYELASH SET
Planning or 'mapping' out the lash set helps in achieving the desired look. It allows you to work efficiently, knowing what size and type of lashes to use and where.

Hydrogel Under Eye Patches and Lash Tape are used in this set. To shop, please click here.
STEP #5 | ISOLATION
Many lash artists forget to use their pick-up tweezers when isolating. However, both tweezers make positioning and separating your client's tiny lashes much more accessible.
When isolating with both tweezers, angle your isolation tweezer downwards towards the lashes. To provide a clean view range and make isolation simpler, slant your pick-up tweezer up, lifting and moving the lashes away.
Hydrogel Under Eye Patches, Lash Tape, Velour Lash Adhesive, Cashmere Noir Collection Lashes, Lash Wisps, and Straight Isolation Tweezer are used in this set. To shop, please click here.
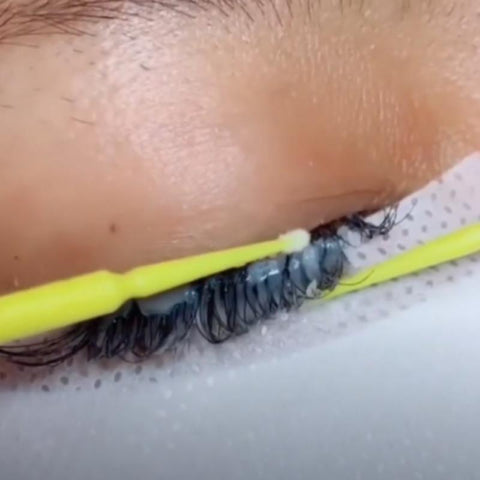
STEP #6 | SLOWLY DIP THE LASH INTO THE GLUE
Dip the extension into the adhesive while holding it by its tapered end, striking the exact balance between too much and too little glue. To avoid retention concerns, make sure you use the appropriate quantity.

Cashmere Noir Collection Lashes, Lash Adhesive Cure Aid and Ultra Crystal Bond are used here. To shop, please click here.
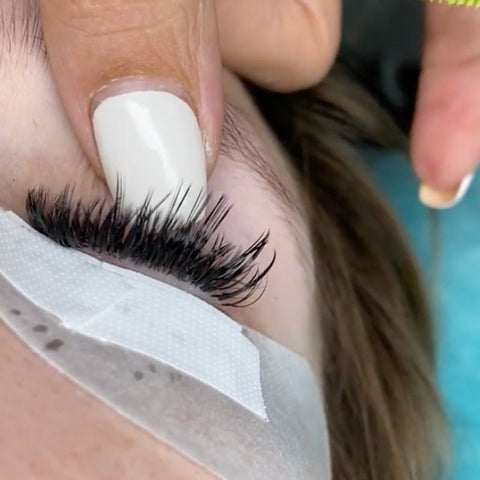
STEP #7 | PROPERLY ISOLATE AND APPLY THE EXTENSIONS
Isolate the natural lashes swipe the extension together with the natural lash. Use the wrapping technique. Coat the natural lash with the adhesive from its base to the tip, ensuring no gaps in the glue. Disperse the lash adhesive equally until it becomes smooth.
Hydrogel Under Eye Patches, Lash Tape, Velour Lash Adhesive, Cashmere Noir Collection Lashes, Lash Wisps, Precision Volume 90 Degree Tweezer and Straight Isolation Tweezer are used in this set. To shop, please click here.
STEP #8 | LASH EXTENSION APPLICATION
Place the lash extension onto the natural lash after swiping it with just enough adhesive to coat it on the natural lash around 1 mm from the eyelid.
Continue to another region or the opposite eye, implementing extensions until you reach your goal. It becomes challenging to isolate more natural lashes; this will assist in avoiding stickies.
Incredible Retention Primer, Hydrogel Under Eye Patches, Lash Tape, Velour Lash Adhesive, Cashmere Noir Collection Lashes, and Lash Wisps are used in this set. To shop, please click here.
STEP #9 | SEPARATE THE LASHES
No multiple lash extensions or natural lashes should be sticking to each other. Separate any lash extensions stuck together with the two sets of lash tweezers. Grasp and separate in a horizontal technique; this is best done even if the adhesive is dry but not completely cured.
On natural lashes, never pull in the vertical route or area with any rigidity. Repeat the application and separation steps until each natural lash has been bonded to the individual lash.
Incredible Retention Primer, Hydrogel Under Eye Patches, Lash Tape, Velour Lash Adhesive, Cashmere Noir Collection Lashes and Lash Wisps are used in this set. To shop, please click here.
STEP #10 | DRY THE LASH ADHESIVE
When all lash extensions have been securely bonded, allow 3 to 5 minutes for the newly adorned lashes to dry.
To improve your retention, you need to use a super bonder to cure the adhesive bond. Using a lash fan, dry the lashes. Mist with distilled water, dry for 3 minutes, and check for stickies.

Ultra Crystal Bond, Lashes, Lash Wisps, Incredible Retention Primer, and Super Bonder are used in this set. To shop, please click here.
Click here to learn about wet wispy lashes and how they can give you a unique, stylish look.
Ultra Crystal Bond, Lashes, Lash Wisps, Incredible Retention Primer, and Super Bonder are used in this set. To shop, please click here.
For more tips like this one be sure to subscribe to our email list, we send very informative and helpful emails every week, please click here.
TIPS ON LASHING A CLIENT WITH BLONDE LASHES
As a lash artist, it's essential to understand the unique challenges and opportunities presented by clients with blonde lashes. Here are three expert tips to ensure you achieve the perfect look every time.
-
Opt for Dark Brown and Brown Lashes: While black lashes are a popular choice, they can sometimes appear too harsh against the light background of blonde lashes. Instead, consider using dark brown or brown lashes. They offer a softer, more natural look while still giving the desired definition and depth.
-
Use Black Patches: Black patches can help to contrast and mask the lighter base of blonde lashes, making it easier for you to see and work on the lashes. This will also provide a clear background, helping you to ensure that every lash gets the attention it deserves.
-
Place Extensions Closer to the Eyelid: One common challenge with blonde lashes is the possibility of light lashes peeking through beneath the extensions. To prevent this, ensure that you place the extensions closer to the eyelid. This method not only masks the natural lash more effectively but also gives a fuller appearance.
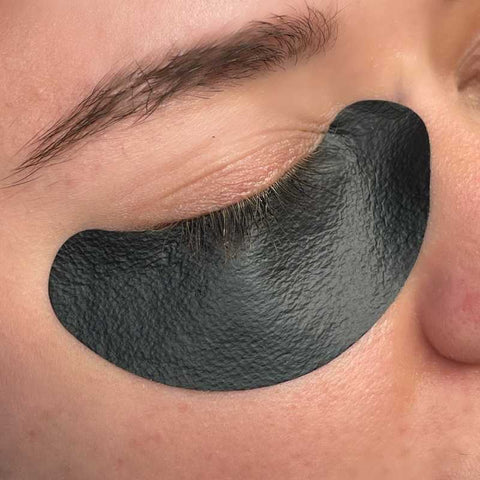
Hydro-Gel Under Eye Patches is used here. To shop, please click here.
HOW DO YOU REMOVE THE EYELASH EXTENSIONS SAFELY AND CORRECTLY?
Here at ThousandLashes, we are only using the best products to ensure no natural lashes will be harmed during the removal. Our Lash Cream Removers are safe, fast, and highly effective in removing unwanted lash extensions.
STEP #1
Once applied, the lash remover dissolves the adhesive bonds, allowing lash extensions to be gently removed while causing no pressure to the natural lash.
Lash Remover is used in this set. To shop, please click here.
STEP #2
Allow sitting for 90 seconds after applying liberally to the lash extensions.

Lash Remover is used in this set. To shop, please click here.
STEP #3
Gently remove lash extensions with a micro swab. After removal, thoroughly rinse. When applied, the formula is easy to control and will not run into your clients' eyes.

Lash Remover is used in this set. To shop, please click here.
STEP #4
We suggest washing the eyelashes after with a lash shampoo to remove any extra residue and wipe the eyes with lint-free wipes.

Lash Foam is used in this set. To shop, please click here.
STEP #5
Once the lashes are dry, you can start your complete set or your refill.

Lash Remover is used in this set. To shop, please click here.
For more tips like this one be sure to subscribe to our email list, we send very informative and helpful emails every week, please click here.
LASH AFTERCARE INSTRUCTIONS
Lash extensions require special care are high maintenance—gentle care to ensure that the lashes last longer and remain in good condition. Correct and proper aftercare is crucial for client retention and your professional reputation.
Mega Lash Box, Velour Lash Adhesive, Super Bonder, and Incredible Retention Primer are used in this set. To shop, please click here.
- Be gentle with your eyelashes. Avoid rubbing or pulling them.
- After the appointment, keep the Extensions dry for about 4 to 6 hours.
- Keep all oil-based products away from your eyes. The oil will trigger the adhesive to break down, resulting in premature lash extension loss.
- Strictly no lash perming!
- Within 4-6 hours of lash application, no saunas, facials, or going to the pool for swimming.
- If you are baking, avoid sticking your head into the oven. It can singe your extensions! When putting something in or taking something out of the oven, turn your head away from it.
- You should never use eyelash curlers.
- Do not try to remove the extension on your own instead, make an appointment with your lash artist.
- Brush your eyelashes daily after getting extensions. Brushing solves the majority of the lash problems. If you notice something wrong with your lashes, try gently brushing them.
Once the application is finished, make sure they understand the importance of lash extension aftercare.
For more tips like this one be sure to subscribe to our email list, we send very informative and helpful emails every week, please click here.
CONCLUSION
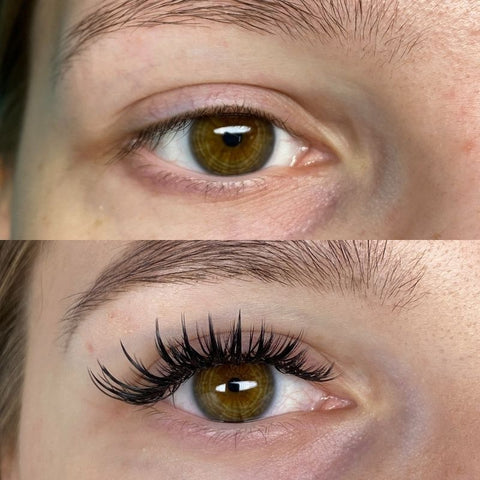
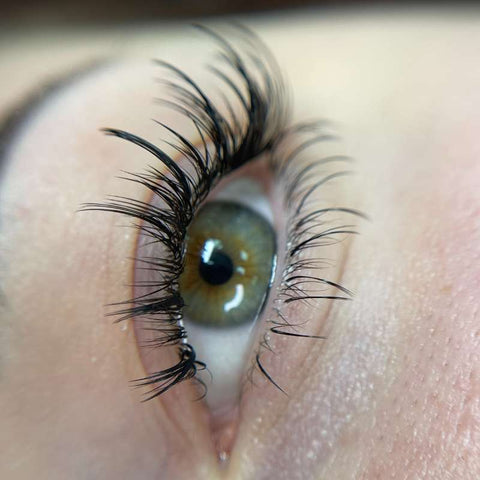
Applying eyelash extensions might seem intricate, but with the right steps and a bit of practice, it becomes a straightforward process. Remember, each lash deserves attention and care. By following our step-by-step guide, you'll ensure your lashes look fabulous and last longer. Whether you're a beginner or just looking to refine your technique, always prioritize the health and safety of your natural lashes.
We hope you've enjoyed reading this blog! If you have any questions or comments, please let us know in the comments below.
We're also always looking for new content ideas, so if you have a topic you'd like us to write about, feel free to comment down below and let us know!
Watch this lash video and learn more about how to apply eyelashes for beginners.
Do you find this blog post helpful? Have you learned something? Leave a comment below and share your thoughts. Don’t forget to share this blog with your lash friend.
Be sure to follow ThousandLashes on our social media - Facebook, Instagram, Pinterest and YouTube for helpful lash tips and tricks.
Anyone needing lash support or lash tips and tricks? Thousandlashes Lash Talk for Beginner Lash Artists will always be open for the kind of support that you will be needing on this lash journey.
For more tips like this one be sure to subscribe to our email list, we send very informative and helpful emails every week, please click here.
If you want to learn and create a beautiful set of wispy lashes. We have a FREE Training Ebook just for you, please click here.
*Grab your FREE Training Ebook on wispy lashes now! ( limited time only )
First time shopping with us? Take 15% off with code 1TIME. SHOP NOW
ThousandLashes team will do our best to service you with our high-quality products and best service.
RELATED POSTS THAT YOU MIGHT FIND HELPFUL TO UPSCALE YOUR LASH BUSINESS:
Best Lash Cart Organizer Recommendations And Tips: Know what are the most popular lash carts on Amazon and trolleys for your lash supplies and where to purchase them, but first let me give you some tips on how you can organize your own lash cart.
How To Choose The Right Eyelash Extension Glue: Let me give you some tips and factors you need to know when searching for the right and best lash glue for extensions.
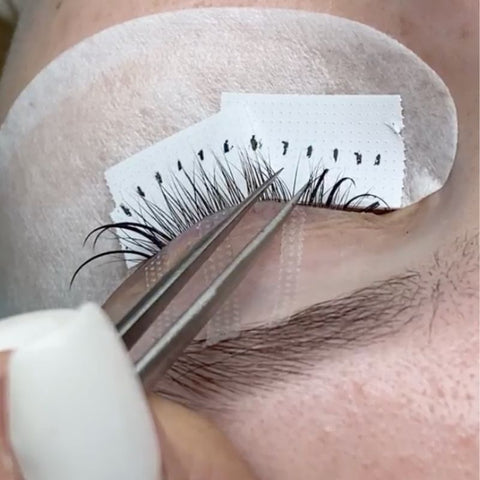
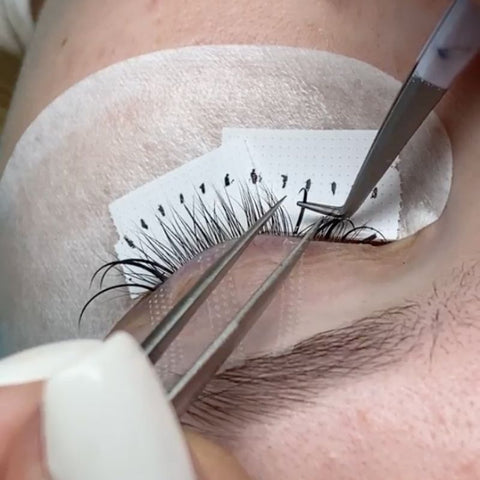
Eyelash Extension Taping Method For Easy Application: Learn more on how to apply eyelash extensions using taping techniques to help you work easier, faster and more efficiently.
Share
Toller Artikel mit sehr hilfreichen Tipps für Anfänger und Profis, die ihre Technik beim Anbringen von Wimpernverlängerungen verbessern möchten! ✨ Für alle, die hochwertige Produkte für Wimpernverlängerungen und die richtige Pflege suchen, schaut unbedingt vorbei bei Eyelashes World – eure Anlaufstelle für alles rund um Wimpern! 🖤
This article is very comprehensive and informative, especially for beginners and professionals who want to improve their skills in applying and removing eyelash extensions correctly. The step-by-step explanations and application tips are very helpful in understanding the process and the importance of aftercare.
For those who want to try various types of high-quality eyelashes, you can check out the exclusive collection at Eyelashes World. The products there are perfect for both natural and dramatic looks, with premium quality that is comfortable to use!
Sind Wimpernextensions schädlich? Der Blog beruhigt: Wenn die Extensions fachgerecht und mit den richtigen Produkten angebracht werden, schaden sie den Naturwimpern nicht. Eyelashes World legt besonderen Wert auf die Auswahl der passenden Extension-Stärke, damit die Wimpern gesund bleiben.
I am your # 1 fans i see all your work i really admire it every time i always stalk your account i am so amaze
For this steps for eyelash is very helpful for the beginners like me
Thank you and god bless❤️❤️❤️