

Lash Direction And Lash Placement: Everything You Need To Know
Would you like a great way to improve your eyelash set, lash direction and lash placement? Do you want to learn the proper eyelash extension placement?
Eyelash extensions are a beauty secret that so many women love, but they can damage the natural lashes if applied wrong. It can be an amazing way to bring out your client's eyes.
That said, a lot goes into the application process, and it can be tricky to get right if you're not sure what you're doing.
As you can imagine, if the extensions keep poking, rubbing, and coming into contact with the lash line, you're in a lot of trouble! Infections and unwanted hair loss. Not cool. We don't want any of that.

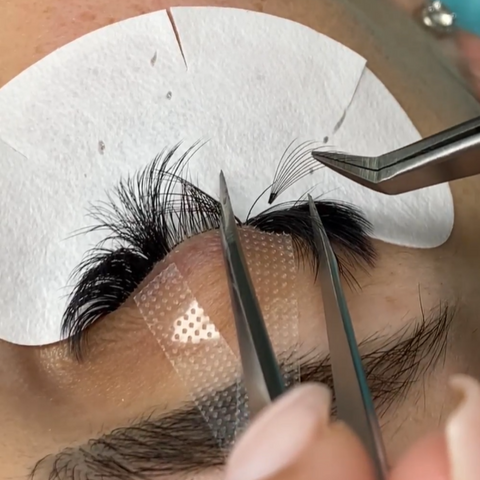
Hydrogel Under Eye Pads, Lash Tape, Promade Fans, L Shape Tweezer and Straight Isolation Tweezer are used in this set. To shop, please click here.
New to lash photo editing? We've got you covered with our Free Lash Editing Tutorial. Click here to learn more!
Applying lash extensions is an art that demands a great deal of attention and precision, as any lash expert knows. It's critical to get the application properly, as even a minor error might have severe implications.
You want to avoid applying the lashes too far above the lash line, and you also want to make sure that you're not attaching them too close to the eye itself. The perfect eyelash extension placement is right in between and perfectly balances all your client's features.
WORK ON IMPROVING LASH DIRECTION
The ways you apply the extensions to natural lashes will have a significant impact on the overall look of your set.
Naturally, there is no cookie-cutter solution that will fit all sets. However, you should look at the clients as a whole in order to evaluate their features and decide which direction you should work on.
-
Wide-set eyes
-
Close-set eyes
-
Narrow eyes
-
Or simply to achieve particular lash style
Hydrogel Under Eye Pads, Lash Tape, Promade Fans, L Shape Tweezer and Straight Isolation Tweezer are used in this set. To shop, please click here.
For more tips like this one be sure to subscribe to our email list, we send very informative and helpful emails every week, please click here.
THERE ARE FOUR WAYS OF DIRECTING THE LASH EXTENSION PLACEMENT
1. Slanted direction outwards
2. Slanted inwards
3. Straight placement
4. Combined directions

Hydrogel Under Eye Pads, Mega Volume Lashes, Elite High Humidity Adhesive, Oblong Tweezer and Straight Isolation Tweezer are used in this set. To shop, please click here.
TIP: After applying the lash fan direct it at the same angle the other fans are facing. After applying each fan, you can placed neatly right next to the fan next to it. This helps overall direction of the set.
For more tips like this one be sure to subscribe to our email list, we send very informative and helpful emails every week, please click here.
LET'S CONSIDER THIS EXAMPLE:
- Outward Lash Direction: Directing lashes towards the outer corners can make eyes look farther apart, which might not be the best look.
- Straight or Inward Lash Direction: Directing lashes straight or slightly inward towards the nose creates a more balanced and symmetrical appearance. Clients will appreciate the overall look more.

Ultra Crystal Clear Bond and Lash Wand Tube are used in this set. To shop, please click here.
For more tips like this one be sure to subscribe to our email list, we send very informative and helpful emails every week, please click here.
LET'S TAKE ANOTHER EXAMPLE:
-
Adjusting for Slanted Eyes: To make slanted eyes look more open and wide, work on straightening the lash direction.
-
Eyelid to Lash Extension Distance: Keep the distance between the eyelid and lash extension under 0.5 cm. If it's too big, the lashes will start dropping and look messy within a week.
-
Positioning: Sit close enough to your client to easily reach the inner corners of their eyes. Avoid resting your elbows on the lash table for better movement.
-
Hand Support: Ensure your hands are well-supported to avoid shaking, which can affect lash direction.
-
Checking Your Work: If you see lashes crisscrossing or open spaces in the lash line, it's a sign of direction mistakes. Removing and correctly placing a few lashes can improve the overall look.
-
Take Your Time: Don’t rush. Explain to clients that achieving perfect lashes requires patience.
-
Angles for a Wing Effect:
Inner corners: Straight at 90 degrees.
Middle to outer corners: Gradually decrease the angle to 45-30 degrees.
Final outside corners: Lay flat at 180 degrees.
Remember, this is just one method. Explore different techniques to find what works best for you.

Volume Lashes mix curls D, CC, and C, and Velour Lash Adhesive are used in this set. To shop, please click here.
For more tips like this one be sure to subscribe to our email list, we send very informative and helpful emails every week, please click here.
HOW CAN YOU IMPROVE THE DIRECTION OF YOUR LASH WORK?
The direction of your lash extensions is essential as it can make or break the final result. Proper lash direction ensures a natural look and enhances client satisfaction.
Here’s how you can improve the direction of your lash extension work:


- Understand Natural Lash Growth: Observe your client's natural lash direction. Each person's lashes grow differently, and aligning the extensions with this natural pattern is crucial for a cohesive look.
- Use Lash Maps: Create a lash map before starting. This visual guide helps you plan the placement of each extension, ensuring consistent and symmetrical results.
- Choose the Right Curl and Length: Select appropriate curls and lengths for different sections of the eye. Use shorter lengths and gentler curls on the inner corners, gradually increasing towards the outer corners for a balanced look.
- Proper Isolation: Isolate each natural lash properly using isolation tweezers. This prevents lashes from sticking together and ensures that each extension is applied in the correct direction.
- Parallel Application: Apply extensions parallel to the natural lashes. This alignment helps achieve a uniform direction, preventing a messy or crisscrossed appearance.
- Use Minimal Adhesive: Avoid using too much adhesive as it can cause clumping and misalignment. A small amount ensures each lash stays in place without affecting its direction.
- Regular Checks: Regularly step back and check your work from different angles. This helps you spot and correct any misdirected lashes before you finish.
- Steady Hands: Practice holding your tweezers and applying lashes steadily. Steady hands are crucial for precise placement and maintaining the correct direction.
- Seek Feedback: Ask for feedback from clients and fellow lash artists. Constructive criticism can provide valuable insights and help you refine your technique.
- Continuous Education: Stay updated with the latest lash techniques and trends. Attend workshops, take online courses, and follow industry leaders to keep improving your skills.
For more tips like this one be sure to subscribe to our email list, we send very informative and helpful emails every week, please click here.
TIPS FOR LASH DIRECTION
-
Make sure the extension is at the same distance from the eyelid as the natural lash. It should be between 0.5 and 0.6 mm thick.
-
When starting a fresh set of lash extensions, it's crucial to consider how you'll angle/point them out to the sides.
-
Don't touch the extension for at least 30 seconds after you've attached it to avoid ruining the direction of the freshly glued extension, switch to a different location or the other eye instead of moving on to the next lash.

Hydrogel Under Eye Pads, Lash Tape, Promade Fans, L Shape Tweezer and Straight Isolation Tweezer are used in this set. To shop, please click here.
For more tips like this one be sure to subscribe to our email list, we send very informative and helpful emails every week, please click here.
PROPER EYELASH EXTENSION PLACEMENT
Apply extensions 0.5mm to 1mm from the skin, parallel to the natural lash. Incorrect placement can cause issues:
- Too Far: If extensions are too far from the lash line, it creates a noticeable gap, making lashes look like they need a refill after 2-3 weeks.
- Too Close: If extensions are too close to the skin, they can touch the eyelid when blinking, causing irritation, swelling, redness, and puffiness.
Proper lash application is crucial to avoid these problems. Make sure you have the right knowledge to apply lashes safely and effectively.

For more tips like this one be sure to subscribe to our email list, we send very informative and helpful emails every week, please click here.
MISTAKES IN LASH DIRECTION: HOW TO AVOID IT?
The multi-directional application of eyelash extensions is the first error. It happens when you don't apply the eyelash extensions in a specific order.
It'll be easier to work with if your client has straight natural lashes, but what about those who have uneven eyelash growth?
BRUSH YOUR EYELASHES AND HAVE A GOOD LOOK AT THEM
You should look above the middle of the eyelash – at the tips, not at the base. Eyelashes should be aligned, if they look at each other or cross each other – some eyelashes are directed incorrectly.

Volume Lashes mix curls D, CC, and C, Velour Lash Adhesive, Lash Brush, Hydrogel Under Eye Patches and Breathable Tape are used in this set. To shop, please click here.
For more tips like this one be sure to subscribe to our email list, we send very informative and helpful emails every week, please click here.
GAPS HELP TO UNDERSTAND THAT THERE'S A PROBLEM WITH THE DIRECTION
If the native lashes before the build-up were without any gaps, this indicates that the lashes in this area aren’t evenly tilted.

L Curl Lashes and Ultra Crystal Bond are used in this set. To shop, please click here.
For more tips like this one be sure to subscribe to our email list, we send very informative and helpful emails every week, please click here.
TAKING AWAY THE OVERLAPPING FANS IS ANOTHER APPROACH TO UNCOVER YOUR FAULTS
The tips of the eyelashes will always be crossed as a result of them. Even if you simply have 3 to 4 such fans, your work will appear sloppy.

L Curl Lashes and Ultra Crystal Bond are used in this set. To shop, please click here.
For more tips like this one be sure to subscribe to our email list, we send very informative and helpful emails every week, please click here.
HOW DO YOU DO EYELASHES WITH CURLY EYELASHES?
Tips for eyelash extension application for curly lashes.

Hydro-gel Under Eye Patches used in this set. To shop, please click here.
Even people with naturally curling lashes are looking for ways to look gorgeous, no matter what sort of lashes they have. I will give you some tips on how to spot coarse, curled lashes and how to apply lash extensions to them flawlessly every time.
Curly lashes are appealing because they are natural, but applying lash extensions to them can be tricky. The lash curl has a natural stunning lift, however there are stray curls coming in different directions on these lashes.
PLACE YOUR CLIENT IN THE BEST POSSIBLE LIGHT
The client should be positioned so that the lash curl's base can be easily seen.
CHOOSE THE RIGHT TWEEZERS FOR ISOLATION
When it comes to size, isolation and measurement are crucial. A designed ruler on the eyelash tweezers allows you to accurately measure the length of your client's lashes.
WHEN IT COMES TO COARSE, CURLING LASHES, BE CAUTIOUS
Having a large selection of lash extensions allows you to cater to clients who have natural lashes of various lengths, curls, and thicknesses.
USE A WARM EYELASH CURLER IF NECESSARY
Before applying the extensions, straighten the client's lashes with a heated eyelash curler.
For more tips like this one be sure to subscribe to our email list, we send very informative and helpful emails every week, please click here.
Do you find this blog post helpful? Have you learned something? Leave a comment below and share your thoughts. Don’t forget to share this blog with your lash friend.
Be sure to follow ThousandLashes on our social media - Facebook, Instagram, Pinterest and YouTube for helpful lash tips and tricks.
Anyone needing lash support or lash tips and tricks? Thousandlashes Lash Talk for Beginner Lash Artists will always be open for the kind of support that you will be needing on this lash journey.
For more tips like this one be sure to subscribe to our email list, we send very informative and helpful emails every week, please click here.
If you want to learn and create a beautiful set of wispy lashes. We have a FREE Training Ebook just for you, please click here.
*Grab your FREE Training Ebook on wispy lashes now! ( limited time only )
To purchase lash products, check out our website. SHOP NOW
ThousandLashes team will do our best to service you with our high-quality products and best service.
RELATED POSTS THAT YOU MIGHT FIND HELPFUL TO UPSCALE YOUR LASH BUSINESS:
How To Choose The Right Eyelash Extension Glue: Let me give you some tips and factors you need to know when searching for the right and best lash glue for extensions.
Eyelash Extension Techniques For Lash Artist: In this blog, you will learn the common lash problems and some eyelash extension techniques that will help you fix your eyelash set.
How To Work With Difficult Lashes?: Detailed video on lash placement and lash direction, how to work and assess your client's lashes and which kind of lash extension suits them best.
Very helpful I recognize some of my mistakes
Leave a comment