

Lash Taping Method For Easy Application
Let's face it; the lash taping method can be the most challenging portion of any lash extension process!
In this blog, we will be discussing the PROs of using lash patches to isolate and work with the layers of your client's lashes and taping techniques for lash extensions.
Every gorgeous set of lashes should be accompanied by a happy, satisfied and comfortable client. Being a lash artist needs a high level of customer satisfaction. And besides, lash fills might take anywhere from 45 minutes and 2 hours or more for complete sets. It's essential that your client feels at ease for them to return.
Clients often complain about improper tape application, which causes them pain and discomfort. When the tape is removed using traditional sticky tape, some extensions can get ripped out, causing client discomfort.

Lashes, Velour Lash Adhesive and Hydro Gel Under Eye Patches are used in this set. To shop, please click here.
New to lash photo editing? We've got you covered with our Free Lash Editing Tutorial. Click here to learn more!
Today, we will go over an exciting lash taping technique using patches; this taping method for lash extensions will help you work easier, faster, and more efficiently, keeping client comfort at the top of your priority.
It is a popular application method for lash extensions, but it does require some skill and practice to master.

Hydro Gel Under Eye Patches, Lash Tape, Mega Volume Lashes and Ultra Crystal Bond are used in this set. To shop, please click here.
TIP #1 MAKE SURE TO CLEANSE YOUR CLIENT'S EYES ( pre- application )
Ensure that you cleanse the client's eyes and eyelids using lash foam shampoo with a gentle cleansing formula that removes eye makeup and impurities from lashes. Ensure that the patches you apply stick very well to the client's skin.

TIP #2 MAKE SURE YOUR CLIENT IS LOOKING UP STRAIGHT
As you work with lash extension patches to isolate the layers of your client's lashes, make sure your clients are looking straight up (not backward) and that they are not talking. It will ensure that your client's comfort is taken into account and the patches are not moving.

TIP #3 KEEP A SAFE DISTANCE FROM THE WATERLINE
Getting the lashes to stay down while staying away from the client's eye is one of the most challenging things. Keep a distance of at least 2-3mm between the pads and the client's waterline.
Some lash pads tend to expand or "melt when exposed to moisture and heated." You must always keep the pad 2-3 mm away from the waterline to avoid this.

Micro Foam Under Eye Patches is used in this set. To shop, please click here.
TIP #4 SECURE THE PATCHES PROPERLY ( if needed )
To keep down any extra lashes that may come out, apply two strips of micropore tape about an inch and a half long down the lash line.
When your client closes their eyes, ask if they feel any pinching or discomfort. Then, with their eyes closed, gently tug the tape and pads to adjust, ensuring their comfort is taken into account.

For more tips like this one be sure to subscribe to our email list, we send very informative and helpful emails every week, please click here.
HOW DO YOU TAPE EYELASH BACK USING LASH PATCHES?
TECHNIQUE #1
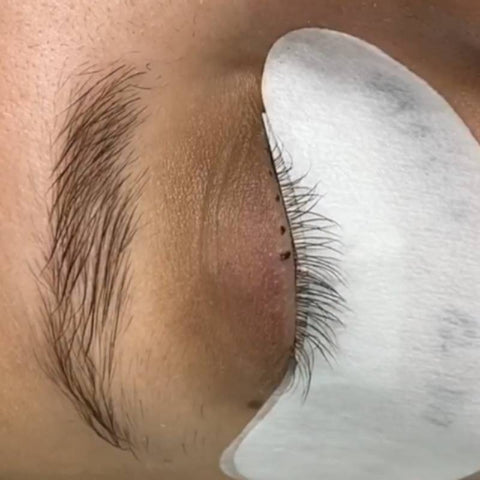
STEP #1 Remove the eye patches from their package, apply them hold lightly on the outer edges. Apply it to the top of the lower lashes, ensuring no contact with the waterline. Adjust the patches as needed for the client's comfort.

Gel under eye patches is used in this set. To shop, please click here.
STEP #2 Take another pair of lash patches underneath the client's lashes. By ensuring the sticky part of the lash, patches are facing the eyelid. Lift the lashes onto the eyelid using the lash patches. Stick the patches onto the client's eyelid revealing the lower layer of the client's lashes.

Gel under eye patches is used in this set. To shop, please click here.
STEP #3 Pull the bottom lash layer out using straight lash tweezers or isolation tweezers.

Gel under eye patches and straight isolation tweezer are used in this set. To shop, please click here.
(after)

Gel under eye patches is used in this set. To shop, please click here.
STEP #4 Apply the extensions to the natural lashes that are exposed. You will have a much easier time working with the exposed lashes since they will be easier to view with this technique. It is an incredible hack to isolate each layer individually if you use a different mapping for your layering.

Gel under eye patches, l shape tweezer and straight isolation tweezer are used in this set. To shop, please click here.
TIP: When using the lash patches, you don't need to worry about the tape pulling out the client’s lashes, as they are less sticky than traditional tape.
For more tips like this one be sure to subscribe to our email list, we send very informative and helpful emails every week, please click here.
TECHNIQUE #2
STEP #1 Apply the under-eye patches and the tape.

Gel Under Eye Patches and Breathable Tape are used in this set. To shop, please click here.
STEP #2 Take another pair of lash patches and apply them to the client's eye area.

Gel Under Eye Patches is used in this set. To shop, please click here.
(after)

Gel Under Eye Patches is used in this set. To shop, please click here.
STEP #3 Pull the natural lashes gently using a straight lash tweezer or isolation tweezer.

(after)
Gel Under Eye Patches is used in this set. To shop, please click here.
STEP #4 Apply the breathable tape to secure the natural lashes from coming out.

Gel Under Eye Patches and Breathable Tape are used in this set. To shop, please click here.
(after)

Gel Under Eye Patches and Breathable Tape are used in this set. To shop, please click here.
For more tips like this one be sure to subscribe to our email list, we send very informative and helpful emails every week, please click here.
LASH LAYERING TECHNIQUE ( taping layers )
As a lash artist, achieving a full and natural look for your clients requires precision and technique. One effective method is lashing in layers using lash tape.
STEP #1
Do the top layer first.

Hydrogel Under Eye Patches and Sensitive Nexcare Skin Tape are used in this set. To shop, please click here.
STEP #2
Remove the lash tape and peel back the middle layer.

Color Lashes, Bullet Adhesive, Hydrogel Under Eye Patches and Sensitive Nexcare Skin Tape are used in this set. To shop, please click here.
STEP #3
After applying extensions to all layers, carefully remove the lash tape and brush through the lashes to align them. Perform a final check to ensure uniformity and fill in any gaps for a seamless, natural look.

Hydrogel Under Eye Patches and Sensitive Nexcare Skin Tape, Promade Fans, Color Lashes, Ultra Crystal Clear Bond, Incredible Retention Primer and Super Bonder are used in this set. To shop, please click here.
REMEMBER: It is essential to pick the correct lash tape when taping the lashes and ensure the lash tape is not too sticky. The best tape to use is paper tape. It is good because the lash tape will come off gently as you peel it off the lashes.
Make sure you are holding the lashes as you pull the tape off because you don't want to pull off your client's lashes that you just did.

Neon Color Lashes, Velour Lash Adhesive, Incredible Retention Primer, Super Bonder, and Promade Fans are used in this set. To shop, please click here.
8 Things You Didn't Know About Colored Lash Extensions
For more tips like this one be sure to subscribe to our email list, we send very informative and helpful emails every week, please click here.
ADVANTAGES OF USING HIGH-QUALITY UNDER-EYE PATCHES FOR EYELASH EXTENSIONS
- It adheres firmly to the client's skin and does not slip or move during application.
- It has a similar form to the under-eye area and a good hold on the bottom lashes.
- It allows every lash artist to quickly grasp the inner and outer corners of the bottom lashes.
- The under-eye patches should be light in color to see the lashes.
Great patches work as a blank canvas for the lash artist to create a map. Lash mapping is an excellent technique for staying on track and achieving the desired look or style.

HOW TO APPLY UNDER-EYE PATCHES FOR EYELASH EXTENSIONS?
- Use lash foam shampoo that has a gentle cleansing formula that removes eye makeup and impurities from lashes to clean and dry your client's eye area, especially if the client has oily skin since the lashes will not adhere properly.
- Remove the lash patches from the plastic gently.
- Make sure that when you apply it to the top of the lower lashes, there is no contact with your client's eye or in the waterline.
- When the lash extension application process is finished, gently remove the patches from the outside corner area.

Hydro-Gel Under Eye Patches and Breathable Tape are used in this set. To shop, please click here.
REMEMBER:
- When applying lash patches, take your time.
- Keep an eye on your isolation tweezers. In most cases, their tips should not contact the eye pad.
- Check the eye pads. It's always better to detect 2 or 3 lower lashes sticking out or even glued together early than to find 20 lower lashes already firmly glued to the upper ones.

Hydro-Gel Under Eye Patches and Sensitive Nexcare Skin Tape are used in this set. To shop, please click here.
HOW TO TAPE BOTTOM LASHES?
- I love using lash tape because it works well to secure short and fine bottom lashes that point upwards. It also helps press down puffy under eyes or high cheekbones.
- Cut about 1.5 inches. Start with the outer corners and place the lash tape along the line while avoiding the waterline.
- You'll do the same on the inner corners to form an "X."
- Once your client's eyes are closed, make sure to check that all the lashes are secured and that the tape isn't riding up to the waterline. If it is, adjust it gently.
TIP: You can use a sensitive tape that's flexible to wrap comfortably around the under eyes. It should have the perfect amount of stickiness while being gentle enough to be pain-free while removing.
Lash taping technique for working with bottom layer.

Gel Under Eye Patches, Eyelash Extension Ballet Slippers Tape, Lashes, Color Lashes, Ultra Crystal Clear Bond, Straight Isolation Tweezer and L Shape Tweezer used in this set. To shop, please click here.
Adding color lashes to the bottom later only.

Lashes, Color Lashes and Ultra Crystal Clear Bond are used in this set. To shop, please click here.
HOW TO USE LASH TAPE?
Eyelash extension tape is excellent for multi-purpose use during the lash extension procedure. You can use it under the eye instead of gel patches and on the top of the eyelid to lift the lid and natural lashes.
There are three considerations to consider while deciding which tape to use:
- Client sensitivity (any allergies to latex, gel?)
- Skin Type (oily skin, dry skin, any medical conditions affecting the skin?)
- Eye shape (what kinds of eyes does the client have? almond-shaped or oval-shaped?)
How to prevent red eyes from lash extensions?
Preventing red eyes after a lash appointment starts with proper taping techniques. Use paper tape and place it as close to the lash line as possible without touching the wet line. This keeps the lower lashes securely in place while protecting the delicate skin from adhesive fumes.
Be gentle when applying and removing the tape to avoid irritation. Always double-check that the tape is smooth and not pulling on the skin or lashes. Following these steps helps create a comfortable experience for your client and prevents redness or irritation after the session.

For more tips like this one be sure to subscribe to our email list, we send very informative and helpful emails every week, please click here.
CONCLUSION
Every lash artist's best friend is lash extension tape, which can be used to fix bottom lashes and calm twitching clients' eyes. It's one of those things that you could get by without during a lash session, but if you learn how to make tape work for you, it'll change your life! Proper taping may appear to be a minor aspect of the lash application, but it is essential.
Do you find these taping techniques helpful? Leave a comment below and share your thoughts. Don’t forget to share this blog to your lash friend who is struggling on working with eyelash extension tape.
Be sure to follow ThousandLashes on our social media - Facebook, Instagram, Pinterest and YouTube for helpful lash tips and tricks.
Anyone needing lash support or lash tips and tricks? Thousandlashes Lash Talk for Beginner Lash Artists will always be open for the kind of support that you will be needing on this lash journey.
For more tips like this one be sure to subscribe to our email list, we send very informative and helpful emails every week, please click here.
If you want to learn and create a beautiful set of wispy lashes. We have a FREE Training Ebook just for you, please click here.
*Grab your FREE Training Ebook on wispy lashes now! ( limited time only )
SHOP NOW FOR LASH TAPES AND UNDER EYE PATCHES
RELATED POSTS THAT YOU MIGHT FIND HELPFUL TO UPSCALE YOUR LASH BUSINESS:
How To Choose The Right Eyelash Extension Glue: Let me give you some tips and factors you need to know when searching for the right and best lash glue for extensions.
How To Work With Difficult Lashes?: Detailed video on how to work and assess your client's lashes and which kind of eyelash extension set suits them best.
Eyelash Extension Techniques For Lash Artist: In this blog, you will learn the common lash problems and some eyelash extension techniques that will help you fix them including lash taping method.
Share
For extesion imel
OMG, you have no idea how much this blog helped me. I’m a new lash tech and was struggling so bad with the lash taping method. But, after reading this and looking at the pictures it helped and explained so much to me. I wasn’t aware that I needed to use the paper tape instead of using the regular tape when using it on the upper eyelid. Boy oh boy was that wrong.😬 (I could never figure out how it looked so effortless when I saw other ppl doing it) lol. 🤦🏾♀️..but now I know, thanks to you. I really just want to say THANK YOU, for creating this article because it really helped a new beginner like myself! 💕
Thanks,
Ashley